Pages

Tuesday, October 12

NZ Fashion week

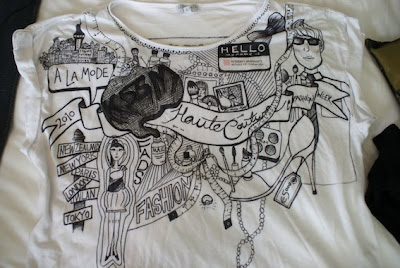
So my sis Gem went up to fashion week a coupla weeks back, and the company she went with were aloud to do anything the wanted to the t-shirts they wore. So Gem gave them to me to attack.

Here is what I did:

First tee, I incorporated various fashion-world imagery to come up with this:


back (ran outta time)


other tee, real preppy


Here is pix of gem wearing them whilst doing the make up on the models at fashion week


What a pro


Hanging with the stars


There was so much good feedback about the tee designs, I was very happy indeed!

Ps. If you or your friends need makeup done for weddings, balls, music videos, photoshoots or whatever, check out my sis: http://lacqa.com/ (She's really good, and been taught by the best in NZ)

Got mush-room for these? (in your belly)

I made these cookies a while ago, to try out my new cookie cutter. I made a butter cream icing and used fondant for the spots.
NOM


a BRILLIANT craft

At the last craft group for the year, one of the girls brought along these knitted christmas lights she'd made. I thought they were so fabulous. I wish to make some for christmas, however I may crochet them instead...

70s lampshade

I had no lamp shade, and not much money to buy a fancy one, so I decided to make a string one, which I hear, was a common thing to do in the 70s.

It cost me about $5 to make.

It was really messy, but very easy...

Get your hands on:
1x large balloon
1x ball of wool
1x ice cream container
1x pot of Vaseline
heaps of PVA glue
string (to hang)
vivid
scissors


Blow up the balloon


Tie it to a long piece of string


Measure the circumference of your light bulb and draw a circle on your balloon. You will not string in this area.


Get a scoop of vaseline


And spread it all over the balloon


Hanging the balloon from the string (I pinned mine into the ceiling)


Put a whole lot of PVA in a container (I used like 2 bottles of glue)


And unravel the wool, putting it in the container too (I think I used about half of the ball)

Multi coloured wool looks cool for this.


Use your hands to spread the glue all around the wool. It should start soaking it a bit, but it doesn't have to be drenched. Careful not to tangle it up much.


Next start winding the gluey wool around the balloon, working slowly. Remember to avoid the circled piece at the top.


Continue until the wool comes to an end.


Hang it in the sun to dry!


Leave it drying overnight.


Next day pop the balloon inside!


Next carefully put your bulb inside the top of the lampshade...


And weave wool through it, tightening it around the bulb. Make sure it is secure. (Instead of this you can attach a lamp fitting here)


Then carefully put in your bulb back into the light fixture and let it hang!


Thursday, October 7

...And we're back! BELGIAN BUNNIES!

Easy one... I followed the edmonds recipe and instead of boring shapes I made them into bunnies! Kinda like spice bunnies!

They were so yum.


Sooooo many posts to come!

x

Wednesday, September 22

Absence makes the heart grow fonder

dear my dedicated blog followers... So sorry about not blogging in ages... My computer is broken and getting fixed currently. I look forward to sharing my many new posts with you when it returns to me! Love you all xx

Tuesday, August 10

Crast 24 hours

In the Crast (Craft+last) 24 hours I have created these things:

A tartan pinafore dress


And another pill box hat, this time made from red felt.


I also started cutting out some more buntings for my newly painted room... ah so many blogs to write, so little time!
x
Related Posts Plugin for WordPress, Blogger...