Pages

Saturday, December 12

TAG! - You're it

Time to make cute Christmas tags!

Get your hands on some cool paper - as usual I'm using brown paper!


Fold paper in half length ways then cut into four as pictured


Cut off the top corners


Punch holes in the top


I added some snowflake stamps


Then sew along each of the edges with a fun coloured thread


Then add twine and then name of recipient or in my case-the price for my christmas crafts


Add tag to present or what have you!

all done!! ^u^

Tuesday, December 8

Christmas nite-lite

Sick of the same old boring christmas trees?
I certainly am... that's why I decided to take a box of glow-in-the-dark objects and attack my tree!

First find some glow in the dark treasures...


Then attach hoops of string or thread with sticky tape


Look at them all ^U^ - put them on your tree!


Neeeexxxxttt... time you make the 'faux' lights.
Get some string, or even better - glow in the dark string! I got mine from my dad's store - nature discoveries.
Attach little stars on it with tape. Spread them out along the string.


Once you have a long string full of them wind it around your tree...


There you have it! Charge tree under bright lights then it should glow all night for you, without wasting anymore power.
(was quite hard to take photo in the dark!)

Sunday, December 6

Tea anyone?

Just because its summer doesn't mean you need to stop drinking tea!
It's time to take out those fruity teas and mix up some refreshing drinks... Choose your favorite tea...


Slice up a few of these...


And have some lemonade/soda water handy...


I used 4 tea bags in this little jug - which was plenty. Add lemonade to the tea bags and leave for 5-10mins to flavour. (Add lemon slices now too)


Stir the flavour in to but don't use a metal spoon (this will eat away all the fizzy!)
I used a plastic one.
Then taste it to see if there is enough flavour. If so remove the tea bags!


Now pour into teacups and drink!
Add ice too if you'd like.


Mmmm so refreshing :D
Have a teaparty at your house with all your friends this summer!

Saturday, December 5

PO-TA-TOES - Boil 'em, mash 'em, stick 'em on a card!

That's right... remember back to those kindy days? It's time to make those potato stamps again :D

Find a knife, a potato and if you would like - a metal cookie cutter (This makes it super easy to cut out the shape!)


Cut shape out about a cm deep maybs.


Then getcha hands on some paint... I found in my stash a lusty-pearl one


Dunk the stamp in some paint - try half mixing the colours to get a neat marbled effect
Stamp it on to some card!


Now make lots and lots!


If you are lucky you may just end up with one of these from me!! ^U^

Friday, December 4

hansel and gretel <3 candy!

Hello again my friends! Time for more Christmas decorations... this time: CANDYCANE!

Cut a candycane shape from paper or card... make sure it's quite wide - makes it easier to sew!
Then pin and cut out 2 slides of red felt.


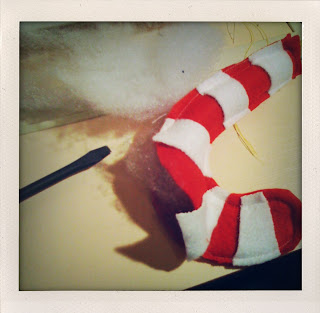
Nextly cut out some white stripes (tee hee hee) from felt and pin them on the red felt. Let them over lap slightly. Taper the stripes in the bend.


And now, sew around the edges and make sure to leave a hole at the top for stuffing! Then STUFF STUFF STUFF


Add the loop of ribbon and sew up the hole...


Trim the white stripes and then you are all finished! Now make many more!! <3


Next post...CUTE CHRISTMAS CARDS! STAY TUNED!

Tuesday, December 1

Yuletide Fun

Well, it's that time of year! So my blog is about to get pretty Christmasy!!

Firstly... the tree is bare, so it's time to make some decorations :D

I am going for the sweet tooth theme, so here is the first decoration:
GINGERBREAD MAN!

You need to get some gingerbread coloured felt and cut enough for two sides out


and chop chop chop
(I used a cookie cutter to get my shape)


Get your mitts on some BUTTONSSSS


And red felt (with sticky back!)


Cut out a smile from the red felt and stick it on.
Now sew on the buttons! Colours for body and black for eyes


Nextly sew around the edges - LEAVE A SPACE FOR STUFFING!


Then stuff and finish of sewing...IMPORTANT: add a loop of ribbon so you can hang it!!


FINISHED! *Swoon*

Saturday, November 28

The money tape!

Well, I've seen a few other people do this and have always wanted to try - make a wallet out of a cassette tape!

So here's how I went about it...

First I bought some old tapes from New Harvest Opshop - kids tapes are bright and colourful, so try to find these!


Nextly I went about splitting the tape in half, some have screws but mine was glued. Do this with a sharp knife, but PLEASE BE VERY CAREFUL I don't want to be responsible for chopped off fingers.
This is what you'll find inside!


Afterwards scrape off the sticker (soaking tape in warm water for a bit helps) If you LOVE the sticker - keep it on!


To get the gummy glue off use a smidge of Chemico - works miracles!


Find some material and a cool zip and measure around the cassette approximately.


Fold in edges and sew in a contrasting colour - to make it look cool


I found this really cute ^u^ ribbon and taped is onto the inside of the little window!


Next mark the corners of the cassette on to the zip and pin in place.


Then sew the zip on!! I didn't even use a zipper foot and it turned out fine. (The zip needs a lot of give in this wallet - the wider it is the more money/cards you will fit in!)


Nextly glue the zip and material to the inside of the tape - I used hot glue gun


Tuck in the zip ends etc.


Then I glued some more of the ribbon to tidy up the underside and make it look like the tape!


Add your cards/money


Zip it up and you are ready to go!
IMPORTANT Make sure you keep checking that the case zips and unzips throughout making this, as it would be terrible if some glue got in the way of the zip and it broke!!

If you want you can doodle on the case too... looks pretty cool.
I might experiment next with a hinge one, as the zipper one doesn't open that far.

Have fun!
Related Posts Plugin for WordPress, Blogger...